Tuesday, August 31, 2010

Fashion & Beauty Ethos: Tips & Tricks To Applying Eyeliner

Eyeliner can make eyelashes appear thicker, give the illusion of almond shaped eyes, make eyes appear larger, and even bring more depth to the eyes. When shopping for eyeliner, you have the option of choosing creams/gels, pencils, liquid, and even eyeliner powder. Here are some tips and tricks to help take the fuss out of applying eyeliner! 
  • Use a primer underneath your eyeliner to help color stay put. If you don't have primer, you can always use concealer and lightly top it off with your favorite pressed powder
  • Set eyeliner w/eyeshadow to create even more long-lasting coverage
  • If you are going to line your waterline, make sure to sharpen your pencil after-wards [for sanitary reasons]  
  • Make shorter even strokes when applying eyeliner, as it makes for an easier application
  • Rest your elbow on a counter if you have trouble keeping a steady arm 
 
Egyptic: This bold, edgy Egyptian-inspired cat eye just happens to be one of my favorite looks on the runway this season.  
  • Line should be thinner near the inner eye, and graduate towards a thicker line near the outer eye
  • Slightly wing the liner up in the direction towards the end of your brow
  • Exaggerate the inner eye area by "pulling" the liner past the tear duct
  • For even more of an edge wing out the lower lash line as well 
  • For darker more dramatic color, "trace" over your pencil liner with a black gel/cream liner

Natural: Not to be confused with tightlining, this method requires lining the area above the lash line. I prefer doing this technique with pencil liner
  • For more of a natural look, skip lining the tear duct, and keep the line thin and as close to the lash line as possible. 
  • Smudge liner to remove harsh lines, creating more of a natural look. 

Open Eyes: I love utilizing this technique when I want my eyes to take center stage without wearing a lot of makeup. 
  • This is perfect for those with smaller eyes, as this method opens the eyes and makes them appear wider
  • Line should be thinner near the inner eye, and graduate towards a thicker line near the outer eye on both the upper and lower lash line. 
Tightlining: Tightlining is one of my favorite technique on those days I want to bring attention to my eyes without a visible "line". Tightlining the eyes makes the lashes appear thicker, darker, and enhances the overall shape of the eye. Utilize this technique on those days you're wearing very little makeup, as it lends a polished, natural look. 

Tightlining is best done with a waterproof gel/cake liner [as it easily adheres to lash line] and a flat brush [MAC 212], or a very thin eyeliner brush. Here are the steps for tightlining [sometimes referred to as invisible liner]:
  • On a small sterile container, add a bit of water and to it add a bit of your cake/gel liner. The consistency should be that of shoe polish for an even hassle-free application. 
  • Gently pull your lid up, and lightly apply your eyeliner to the actual lash line [the roots of your lashes], not your waterline [the moist eye membrane]  
  • The easiest method of applying the eyeliner is making tiny dots in between the roots of your lashes

Pops of Color: Utilize colored eyeshadow to add more of an edge to your makeup! Line upper & lower lash line, then smudge the color using a smudge brush. You can also "set" the liner with a matching eyeshadow for a richer hue [and also prevents smudging]. 

I Used:
Nars Bladerunner Quad
Sephora Nano Eyeliner Pencil in Khaki Green
Smoldering Color:Smokey eyes don't just have to be in browns, and blacks. Play around with jewel-tone colors to add more of an interesting element to your eyeshadow. Here I kept the upper lash line free of liner, and lined the bottom lash line only. I added more depth to the eyes by adding a darker shadow to the outer most portion of my eyes. To make my eyes appear wider, I swept a shimmery color along the tear ducts.

I Used: 
Sephora Nano Eyeliner Pencil in Azure Blue
Nars Isolde Quad [Gold]
Stila Borealis Quad [Dark Blue]
I love these Nano eyeliner pencils from Sephora! They are ultra pigmented, and wear well on women of color. For only five dollars a pop, these make a pretty good bargain!
Bobbi Brown Long-Wear Gel Eyeliner - Hands down my favorite gel liner, it goes on smooth, dark, and lasts all day. I like to do the tightlining technique with this gel, as well as dark cat eyes!

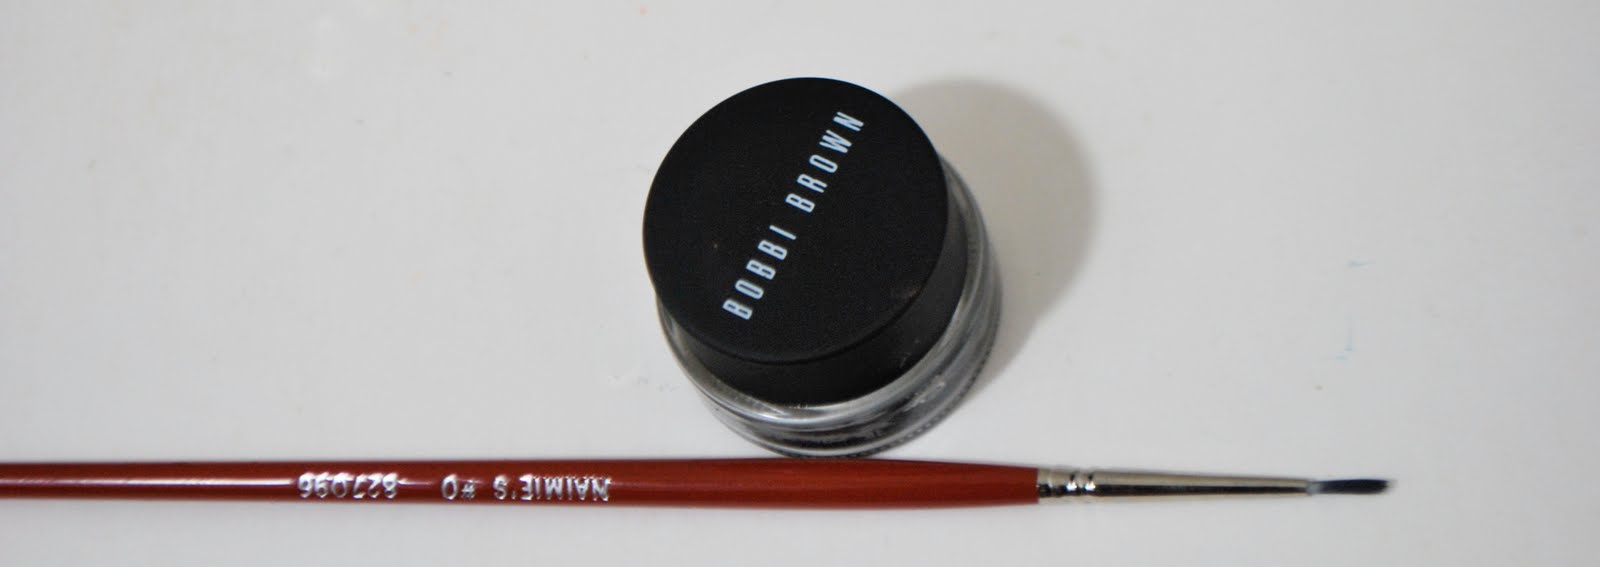
Eyeliner Brush - I use a cheapie eyeliner brush from Naimie's [about $4]. However my favorite eyeliner brush is the bent eyeliner brush by Sonia Kashuk; you can find one at your local Target for about $9.99


Follow me on Twitter | Add me on Bloglovin' |   

Skin Care | My Skin Care Regimen >> Video


I have a lot of posts on skin care, and many of you have requested I do a video on my actual skin care regimen, so that you can get a better idea of what I do on a day-to-day basis. So here it is! For those of you that are unable to watch the video, here's an outline of what's covered.
A Brief History On My Skin:
I have very oily, sensitive, acne prone skin. The only commercial products that has successfully kept my skin clear and free of blemishes has been Dermalogica brand products [Check this post for more info]. I am no longer using Dermalogica, and have opted for more of a natural regimen which includes Oil Cleansing, Natural Spot Treatments, Facials, & Moisturizers.  
  • Oil Cleansing Removes:
  • Dead Skin Cells
  • Excess Oils
  • Toxins
  • Makeup
My Morning & Night Routine:
  • Apply Oil Cleansing Mixture [60% Castor Oil, 20% Grapeseed Oil, 20% Hazelnut Oil] all over my face, and massage into my skin. This will gently exfoliate, and remove impurities, dead skin, excess oils etc.
  • Place a clean towel under a stream of hot, running water. Lightly wring towel, and drape it over entire face until cool. This opens your pores [and gives you a mini steam treatment] allowing the Castor Oil to draw the toxins out of your skin, while the secondary oils/essential oils permeates deep into the skin, lending it's moisturizing and therapeutic properties. Repeat 2-3 times. Then gently wipe skin of excess oil. 
  • Rinse face with cool water to close the pores
  • Spritz a bit of my homemade Apple Cider Vinegar & Green Tea Toner on my face 
  • Apply a dime-size amount of Grapeseed Oil as my moisturizer. I love this because it's a very light, yet moisturizing oil that also doubles as an astringent. 
  • I do not apply sunscreen because Grapeseed Oil can act as a natural sunscreen [The SPF rating would be about a 4]. It works well for eliminating free radicals, and also has amazing antioxidant properties that promotes the repairing of cells. 
Special Treatments:
Twice Weekly, I prepare an exfoliant using 1tablespoon of raw honey, and one tablespoon of brown sugar;
  • I apply the mixture to my freshly cleaned face, and massage gently for about 3-5 minutes 
  • The exfoliant mixture helps to slough off dead skin cells, brighten dark marks, as well as even out the skin tone while imparting moisture
  • Rinse mixture with warm water to thoroughly remove all traces of honey and sugar
  • Follow up with a cool water rinse
  • Spritz a bit of my homemade Apple Cider Vinegar & Green Tea Toner on my face 
  • Apply Grapeseed Oil as my moisturizer of choice 
Once weekly, I prepare a special detox mask using Bentonite clay and sour cream. Bentonite Clay is wonderful for removing toxins and excess oils, and the sour cream makes a great addition to this mixture as the lactic acid in the sour cream helps fade blemishes, and act as a low grade chemical peel. 
  • To prepare the mixture, add two tablespoons of Bentonite Clay to four tablespoons of sour cream, and mix well.
  • I apply the mixture to my freshly cleaned face, and massage gently for about 2-3 minutes
  • Allow the mixture to dry thoroughly, then wipe clean with a damp cloth
  • Follow up with a cool water rinse to close pores
  • Spritz a bit of my homemade Apple Cider Vinegar & Green Tea Toner on my face 
  • Apply Grapeseed Oil as my moisturizer of choice 
Supplements, and Dietary Regimen:
  • Every morning, I have a bowl of yogurt with 2 tablespoons each of Wheat Germ & Ground Flax Seeds. Flax Seeds contain a high amount of Omega 3 and Omega 6 Fatty Acids which are essential in the role of maintaining healthy skin/hair as well as preventing and/or clearing up skin disorders such as Psoriasis, Acne, and Eczema. Wheat Germ is also beneficial for clearing skin disorders, and is also rich in antioxidants.
  • I also take two tablespoons of Cod Liver Oil daily! One tablespoon in the morning after breakfast, and one tablespoon in the evening after dinner. The Cod Liver oil works wonders for clearing the skin, giving it a bright, and youthful glow.  The abundance of fatty acids found in Cod Liver Oil reduces inflammation, and also improves the structure of skin cells. The Vitamin A in Cod Liver Oil is the main component in helping correct and prevent future skin disorders. And finally, the Vitamin E oil acts as a natural antioxidant, and protects the skin from UV damage. 
Where to get the ingredients mentioned in this post. For your convenience, I have hyperlinked online sources as well:
  • Grapeseed Oil - Your local grocery store [I find that Grapeseed Oil is cheaper in most ethnic grocery stores]
  • Castor Oil - Can be found in the first aid sections of most drug stores
  • Hazelnut Oil - Is located in the cooking isle of most health food stores [tip: if it isn't in the cooking isle, try the cosmetic isle]
  • Bentonite Clay - Is located in the cosmetic section of most health food stores. The most popular brand [in health food stores] is Aztec Secret Indian Healing Clay. 
  • Organic Raw Honey - Can be found in most health food stores  
  • Cod Liver Oil - Is located in the pharmacy department of most drug stores, and in the vitamin section of most health food stores   

Follow me on Twitter | Add me on Bloglovin' |   

Monday, August 30, 2010

Giveaway: Bee Mine Be Hold Curly Butter


Three lucky winners will have a chance to get their hands on one of my favorite products Bee Hold Curly Butter!! All you have to do is tell me why you want to try it, and how you plan to use it! Click here for my review on this product!

I will use random.org to generate THREE winners! This giveaway will run close 11:59 September 13th - <this post for the list of winners! The rules are simple, one entry per person, and you must be a subscriber of the blog.  Good luck to all of you!!

Follow me on Twitter | Add me on Bloglovin' |   

Product Review: Cantu Shea Butter Leave-In Repair Cream


Cantu Shea Butter Leave-In Repair Cream has been has been on my radar for some time now. I've seen raves on many hair forums on how it contributes to amazing twist outs, and my buddy Lo swears by this product as well. I will admit that I was kinda iffy on whether or not a leave-in treatment would give me ultra defined curls, however I decided to give it a go anyway.

Product Claims [according to website]:
Cantu shea butter Leave In Conditioning Repair Cream is made with real shea butter and essential oils to replace vital oil in your hair leaving it stronger and healthier with a natural shine.
Cantu shea butter leave in conditioning repair cream can be used on wet hair as an intensive moisturizing treatment or to tame frizz and fly-aways. 
Cantu Shea Butter Leave In Conditioning Repair Cream helps…
  • moisturize dry brittle hair with deep penetrating oil and emollients
  • soften, detangle and add shine to hair 
  • protect hair against heat and sun styling damage
  • provide extra protection from split ends and breakage 
The Verdict:
It did a great job of softening my hair, however I wouldn't say it gave me the amount of definition I would have liked. I would however like to use this underneath Komaza Care Coconut Pudding, Bee Mine Bee Hold Curly Butter, or Miss Jessie's Curly Pudding to see how it fairs. At $5.00 a jar, I will definitely keep this in my styling arsenal and use it as a leave-in versus a styler. 

One thing I did notice about this product is that it left a slight waxy residue. I can attribute this to the fact that I used more than the recommended amount, as I applied a quarter size amount to each section of hair I twisted. I imagine the issue with residue will be eliminated once I use it as a leave-in conditioner vs a styling aid. 

Additional Thoughts:
If you're looking for something that gives mega definition to your twist outs/braid outs, opt for something that offers more hold and use this product underneath to keep it soft, hydrated, and manageable. 

This product is formulated to help control breakage and impart moisture, which makes it a wonderful inexpensive option for transitioners. 

Where To Find It:
Target
Walgreens
CVS
Rite Aid


Follow me on Twitter | Add me on Bloglovin' |   

Friday, August 27, 2010

Imagination Is The Beginning Of Creation. You Imagine What You Desire, You Will What You Imagine, And At Last You Create What You Will - George Bernard Shaw

Thought I would share some of my photography with you today - And since we are on the subject of photography, here are a few of my favorite photography resources! I will be working on updating the site with a resources section soon which will include more info on Photography and other topics of interest. 

I also want to thank everyone out there for the overwhelming amount of love and support you have shown from day one. The sisterhood and positive support has been tremendous, and I am very grateful for it all! A big shout out to some of my male readers out there, thanks guys for support as well! 
 
Blogs/Websites:

Books:                                                                                                                                                        

Spotted this beautiful building downtown!

 I talked to this gentlemen briefly about issues some of the homeless men and women of Downtown L.A are facing. Their public benefit cards are being stolen, and they are being physically, sexually, and verbally abused. I am starting a non-profit this year in order to bring awareness to these issues, as well as provide a safe haven, delicious healthy food and snacks, resources, clothing, and toiletries to assist them in their transition back into society. As no one should ever be forgotten.

At my favorite Cafe; Bricks & Scones, working on my editorial schedule for the blog, I have a ton of videos and special features lined up for you all! 
 
Walking around the Flower District, I love putting together my own floral arrangements on the cheap! Ten bucks and under is usually my limit.
 
 This building had a lot of character!

 I thought the eyeglass necklaces at Forever 21 were pretty cool!

Still eating my yogurt sprinkled with Flax Seed & Wheat Germ. It's definitely made a big difference in my skin!

Yesterday I wore two bun's on either side and slapped on a hat. I was feeling a bit hair-lazy that day. I'm wearing my new favorite earrings my mum brought back from Africa. Thanks mum!

Later on that night, I took it down to go out to the movies. I only had five minutes to get ready, so I just spritzed it with a bit of Tui Leave In by Carol's Daughter and left the rest up to nature.

 This pic was taken earlier this week, I intended on sharing my Bantu Knot out results. However it was an epic fail [as they always seem to be]. I had to run some errands and didn't have time to finagle it back into a ponytail, so I wrapped it up. E-badu style and went on my merry way.

Happy Friday everyone! I will see you all Monday!


Follow me on Twitter | Add me on Bloglovin' |   

Thursday, August 26, 2010

All About Hair: Start At The Scalp For Healthy Hair Growth


Did you know that maintaining a healthy scalp is essential for the overall growth and health of your hair? Your scalp is responsible for sending sebum [natural oils] and nutrients along the hair shaft resulting in hair that is properly hydrated and nourished. 
 
How many of you exfoliate your scalp? Did you know that exfoliation helps to remove dead skin cells, product buildup, as well as excess sebum? Dead skin cells, buildup and the likes can all cause inflammation [aka; an itchy, flaky scalp], which can later lead to thinning hair, and even hair loss [in fact, inflammation is one of the number one causes of hair loss in women today]. 

Another culprit for hair loss is products loaded with PETROLEUM. Petroleum "seals" off the scalp, thus trapping dead skin, bacteria, and perspiration under the layer of petroleum, which can also result in inflammation of the scalp; and later hair loss. 
 
What Can You Do?
Pre-Shampoo - A pre-shampoo treatment is necessary as shampoo is water-soluble, therefore it will not remove sebum [sebum is oil-soluble], toxins, and pollutants that are lodged in your hair follicle. Oil dissolves oil, in our case; the oil from your pre-shampoo treatment will dissolve excess sebum, and other oil soluble residue on your scalp. [pre-shampoo 1x weekly]
 
Tip: Formulate your Pre-Shampoo treatment with herbal infused oils to deliver nutrients deep inside the hair shaft, as this will strengthen the hair and nourish the follicle. 

Here's A Great Pre-Shampoo Recipe:
Add 1/2 cup Coconut Oil to a Crock Pot set on low; drop in 1 teaspoon each of the following herbs: Horsetail, Rosemary, Sage, and Burdock Root. Allow herbs to steep in the oil for about 20-30 minutes. Remove the herbs from the oil and let cool. Apply herbal infused coconut oil to unwashed, dry hair and follow your normal pre-shampoo routine.

About This Formulation:
  • Horsetail: Purported to speed hair growth, clear skin inflammations, and strengthen hair follicles
  • Rosemary: Rosemary is purported to stop hair loss, add sheen, and impart shine and nutrients
  • Sage: Sage is great for clearing up skin inflammations Burdock: Imparts shine, strengthens hair at the follicle, and nourishes hair with essential fatty acids
Exfoliate Your Scalp Once Weekly - You can also gently exfoliate your scalp in lieu of pre conditioning treatments.

Here's A Great Scalp Exfoliant Recipe:
Mix 2 Tablespoons of Brown Sugar + 5 tablespoons of Jojoba Oil and 2 drops of Tea Tree Oil in a small bowl. Massage the exfoliant mixture gently onto scalp with the balls of your fingertips [do not scratch] for about 1-2 minutes. Rinse well with cold water, then follow up with an ACV rinse to remove any additional product residue.[exfoliate 1x weekly]

Nourish & Stimulate Growth                                                                                                                     
Scalp Massages - Massage your scalp at least three times weekly with the balls of your fingertips for about 10 minutes, as it stimulates blood flow to the follicles and promotes hair growth. Using a natural bristle brush, brush your hair to distribute natural oils along the hair shaft. Brushing your hair stimulates the scalp as well.
 
Enrich Your Scalp Massage Oil With Nourishing Essential Oil                                                              
Add 3 drops each of the following essential oils to 1/4 cup of Jojoba Oil: Tea Tree, Rosemary, Lavender. Mix well then add 3 drops of Vitamin E oil. Add to a dark amber bottle, and store in a cool location. 

Tip: Store all products formulated with a large amount of essential oils in dark, amber colored bottles [like these]. As light has a tendency to damage essential oils. Storing your formulation is bottles is also recommended, as essential oils can degrade plastic containers.

About This Formulation: 
  • Jojoba Oil: Jojoba Oil is non-greasy and most closely resembles the skin's sebum. It's antibacterial properties help to clear and prevent skin inflammation on the scalp. Purported to help aid in speeding up hair growth. Removes the buildup of sebum and other oil-soluble buildup. 
  • Tea Tree Oil: This natural anti-viral, anti-bacterial, and anti-fungal essential oil is highly effective when it comes to preventing skin inflammation, and keeping bacteria at bay.   
  • Lavender Oil: Stimulates circulation which aids in hair growth, and also helps eliminate drandruff 
  • Rosemary Oil: This essential oil nourishes the scalp, slows down premature hair loss, imparts mega-shine, and also helps eliminate and prevent skin inflammations. 
  • Vitamin E oil heals the scalp, and also helps protect the hair shaft from harsh environmental elements

Want An Easier Alternative? Try Some Of These Over-The-Counter Products:

Follow me on Twitter | Add me on Bloglovin' |   

Beauty & Skin Ethos | Skin Quick Tip: 5 Tips To Fade Dark Blemishes!

Alek Wek has the most beautiful skin I have ever seen! [source:]

Tired of spending money on skin care products chock full of hard-to-pronounce ingredients that do more harm than good? Here are a few quick, easy, and most importantly effective natural solutions to fade unsightly blemishes!

Fruit Scrub Formulated with Alpha & Beta Hydroxy Acids: Alpha & Beta Hydroxy Acids are extremely helpful in fading dark spots, as well as evening out skin complexion. Specialty products formulated with Alpha & Beta Hydroxy Acids usually start at $20 on up. Save your cash, and formulate your own products at home for a fraction of the cost; as these acids are easily found in Apples, Oranges, and Grapefruit at your local supermarket. - Take one apple, orange, lemon and puree in a blender. Mix in about 1/3 cup of fine raw cane sugar [the glycolic acid found in cane sugar helps minimize wrinkles, even skin pigmentation, and gently exfoliate skin], and apply the mask to your face. Gently massage mixture into skin, and allow the mask to sit for about 15 minutes, then rinse with cool water. [use 1-2 weekly]

Vitamin E Oil: Apply Vitamin E Oil to face nightly to help fade blemishes, and protect the skin from additional post inflammatory breakouts caused by acne. You can purchase vitamin E capsule's, puncture them, and use the oil from the capsule. [use twice daily]

Lemon Juice + Manuka Honey mixture: Lemon juice has long been praised for it's ability to lighten dark blemishes. - Apply lemon juice to affected area, allow to dry, then apply a small amount of Manuka honey over the area you applied the lemon. Manuka honey is naturally enriched with lactic acid which is very helpful in lightening skin blemishes. Manuka honey also has strong medicinal and antibacterial properties which makes it very effective in eliminating issues with acne, and maintaining an even skin complexion [use twice daily].

Tip: Manuka Honey can be found in most health food stores. I purchase mine from Vitamin Shoppe

Sour Milk Treatment: This treatment is similar to a low-grade chemical peel, as the lactic acid acts as a natural exfoliant, and skin brightener. Apply sour milk nightly to entire face, allow to dry, then rinse well with cool water. 

Lemon Juice + Multani Mati Mix: Mix enough lemon juice with Multani Mati Powder to make a thick paste; then apply the mixture onto each spot, allow to dry thoroughly, and rinse with cool water. You can use this mixture on your elbows, knees, as well as your face! - Fuller's Earth powder is enriched with silica, iron oxide, lime, as well as magnesia and is a skin-clearing/brightening powerhouse. It gently removes dirt/toxins, draws out excess oils, and helps lighten dark spots caused by acne. [use twice daily]

Tip: If you can't find Multani Mati in your local Indian Grocery Store, try a health food store for Fuller's Earth powder [as they are one in the same].


Follow me on Twitter | Add me on Bloglovin' |   

Wednesday, August 25, 2010

Epicure: Chicken Tetrazzini

Have you ever made a meal that was so good you had it for breakfast the next morning? Meet Chicken Tetrazzini, an amazing baked Chicken Linguine dish with a rich cream-based sauce. This recipe has been on my radar for sometime, but because of the mass of butter, heavy whipping cream, and the addition of 4 cups of Whole Milk, I decided to save this for a cheat day. 

It was labeled an intermediate dish, but I wouldn't say that it was complicated to make. Time consuming yes. Difficult no. Indeed it has several steps, and it includes a reduction, but it's so easy, a beginning cook could complete it with stellar results.  
Chicken Tetrazzini - Recipe Courtesy of Giada De Laurentiis
Ingredients:                                                                                                                                               
  • 9 tablespoons butter
  • 2 tablespoons olive oil
  • 4 boneless skinless chicken breasts
  • 2 1/4 teaspoons salt
  • 1 1/4 teaspoons freshly ground black pepper
  • 1 pound white mushrooms, sliced
  • 1 large onion, finely chopped
  • 5 cloves garlic, minced
  • 1 tablespoon chopped fresh thyme leaves
  • 1/2 cup dry white wine
  • 1/3 cup all-purpose flour
  • 4 cups whole milk room temperature
  • 1 cup heavy whipping cream, room temperature
  • 1 cup chicken broth
  • 1/8 teaspoon ground nutmeg
  • 12 ounces linguine
  • 3/4 cup frozen peas
  • 1/4 cup chopped fresh Italian parsley leaves
  • 1 cup grated Parmesan
  • 1/4 cup dried Italian-style breadcrumbs

Directions:                                                                                                                                                    
Preheat the oven to 450 degrees F.

Spread 1 tablespoon of butter over a 13 by 9 by 2-inch baking dish. Melt 1 tablespoon each of butter and oil in a deep large nonstick frying pan over medium-high heat. Sprinkle the chicken with 1/2 teaspoon each of salt and pepper. Add the chicken to the hot pan and cook until pale golden and just cooked through, about 4 minutes per side. Transfer the chicken to a plate to cool slightly. Coarsely shred the chicken into bite-size pieces and into a large bowl.

Meanwhile, add 1 tablespoon each of butter and oil to the same pan. Add the mushrooms and saute over medium-high heat until the liquid from the mushrooms evaporates and the mushrooms become pale golden, about 12 minutes. Add the onion, garlic, and thyme, and saute until the onion is translucent, about 8 minutes. Add the wine and simmer until it evaporates, about 2 minutes. Transfer the mushroom mixture to the bowl with the chicken.

Melt 3 more tablespoons butter in the same pan over medium-low heat. Add the flour and whisk for 2 minutes. Whisk in the milk, cream, broth, nutmeg, remaining 1 3/4 teaspoons salt, and remaining 3/4 teaspoon pepper. Increase the heat to high. Cover and bring to a boil. Simmer, uncovered, until the sauce thickens slightly, whisking often, about 10 minutes.
Bring a large pot of salted water to a boil. Add the linguine and cook until it is tender but still firm to the bite, stirring occasionally, about 9 minutes. Drain. Add the linguine, sauce, peas, and parsley to the chicken mixture. Toss until the sauce coats the pasta and the mixture is well blended.

Transfer the pasta mixture to the prepared baking dish. Stir the cheese and breadcrumbs in a small bowl to blend. Sprinkle the cheese mixture over the pasta. Dot with the remaining 3 tablespoons of butter. Bake, uncovered, until golden brown on top and the sauce bubbles, about 25 minutes. 


Follow me on Twitter | Add me on Bloglovin' |   

Reclaim That Positive Energy Pt 3 - Work Smarter Not Harder!

 [source] I love her colorful Caftan! 
This is our 3rd and final installment on how to Reclaim Positive Energy. If you haven't checked out the first two, you can find Part 1 here [How To Reclaim Your Positive Energy - Part 1], and Part 2 here [Reclaim That Positive Energy Part 2 - Bring Light & Balance Into Your Life]. 

In today's virtual meeting of the minds, we are going to talk about creating healthy habits which in turn fosters productivity. Creating healthy habits and increasing your productivity level is essential if you are going to quench your insatiable thirst to improve the quality of your life. 

These very simple tactics, have really helped me change a lot of my undesirable habits [like procrastination, very poor work habits], and made more time for me to work on accomplishing the things that mean the most to me [such as fitness, getting more in touch with my spirituality, community outreach, and generating content for my blog]. I am still very much a work in progress, but I can honestly say that without implementing these principles and values I would still feel overwhelmed and unsure of where to start. 

Habits:
Write down the habit you wish to change, and how you wish to change it - Since we are focusing on productivity, try to identify your habits that prohibit your productivity; these can be issues with television, internet, an active social life, procrastination etc.  

Devise a "workaround plan" -  Identify the triggers for these bad habits, then identify your replacement habit. For instance; if stress triggers you to sleep more which takes a toll on your productivity, you can opt to meditate, walk, run, or listen to music when stressed vs sleeping. It's all about identifying triggers to your current habits, and replacing them with more ideal habits. 

Work on ONE habit per 30 days - Don't overwhelm yourself with all of these resolutions. Studies show that the best way to change a habit, is to work on ONE at a time. Ever wonder why most New Years Resolutions fall through the cracks? It's because most people tend to bite off more than they can chew.

Make a commitment to exercise those new habits for a minimum of 30 days - Stay focused, try to complete your new habit repetitively for 30 days without exception. 

A Few Reasons Productivity Is Important:
  • You will work more effectively; it will be much easier for you to cut the fluff and dive into the work that creates the most impact!
  • You get more work done faster with less angst, energy, and stress!
  • Working more efficiently helps prevent fatigue and burnout [don't you feel much more energized about a project when you have accomplished a goal vs looking at an unfinished task that has been staring you in the face for the past two weeks?] 
  • Productivity will allow you to have MORE free time! 
  • Productivity will push you to become so efficient you can excel in various aspects of your life simultaneously

How to Stay Productive:                                                                                                                            
Get Into Do Not Disturb Mode: If possible, turn off your cell phone, and just say no to Twitter, Facebook, Blogs, Online Magazines etc. while working, as these vices tend to drain productivity. Save the multi-tasking for work-related duties and you will find that you get work done twice as fast. 

Set Daily Goals: Every night before bed, write out a list of simple goals that need to be done by the end of the next day. Setting daily goals helps you to better manage your time, and workload. - Do not add any new goals to your list until the existing goals have been completed. You can also take it a step further and implement sanctions for missed deadlines. You can either dock 10 minutes from your weekly "quiet time", or drop $5 into a jar. 

Find Your Natural Working Rhythm: Are you most productive at night? In the morning? If possible, tailor your workload around your natural working rhythm to ensure you stay motivated, and have optimal levels of energy.

Spend A Reasonable Amount of Time Weekly Doing Nothing: This is your "me time", this isn't time to pick up the kids, cook dinner, do your hair regimen, catch up on your budgeting, or your reading for school. This can be time you mediate, window shop, brunch, spa, or lay around and watch Lifetime Movies [my personal fave]. This time is meant for you to recharge your energy, maintain your sanity, and focus on things other than a "to-do list". - My me time is 30 minutes daily.

If Possible, Work Outside The Home: Confession; when I blog at home, I get nothing done. I normally blog at my local Cafe because it's more conducive to work [there are no tv's, sofa's, beds, I'm less likely to answer my phone etc] - If working outside your home is not a viable option, try a tip I listed in this post and clear your workspace of everything except for what you need to complete the task you're working on. For instance, if you are to get two chapters of reading in for school, you don't need a cpu, blackberry, ipod, etc. A book, pen, pad, sticky notes, and highlighter should suffice. 

30 Minute Self Assessment Sessions: Spend 30 minutes a week assessing your weekly progress, roadblocks, and solution brainstorming. 

Learn How To Say No: There may be times you may have to miss a movie date, or let a call from your BFF go to voicemail. Learn how to be firm with friends, associates, and family without guilt [even if they run the guilt trip on you]. Do not allow anyone to delegate your time!

Follow me on Twitter | Add me on Bloglovin' |   

Tuesday, August 24, 2010

Instant Funk Part Deux

 Here's another installment of Instant Funk; because a girl can never have too much inspiration. 


Braids are a wonderful option for hassle-free protective styling. When getting your hair braided, keep the following in mind:

- Use Human Hair if possible, as synthetic hair tends to cause splits & breakage [because of the texture]

- Exercise caution when pulling your hair up in high-pony's, up-do's or braids; as the excess tension can cause hair loss in weaker areas such as the nape, and hairline. 

- Moisturize your hair even when it's braided, I like to use a mix of water + glycerin [4 parts water + 1 part glycerin]. Oyin's Juices & Berrie's is a wonderful ready-made option.  

- After taking down your braids, opt for a protein + deep conditioning treatment to add strength and moisture back into your tresses. I recommend Sebastian 2+1, or even Dudley's Hair Rebuilder.
If you've newly BC'd [congrats]; You still need to keep your hair hydrated, and soft. Oyin's Burnt Sugar Pomade is a wonderful styler that can be used to smooth down hair, and seal in moisture.

As your hair starts to grow, you may need to reach for richer moisturizers, I recommend Qhemet Amla & Olive Heavy Cream for highly textured curlies, and Qhemet Burdock Root Cream for fine-haired curlies.

  Making a mix of 1 part water to 1 part S-curl activator [yup that stuff] can keep your curly fro super curly, and extra moisturized!

 I'll always love a funky frohawk!

Large accessories makes a wonderful accompaniment to a TWA

 I just love her blow-out

Kinky Curly Curling Custard is the go-to product for new naturals rocking their TWA, it defines the curls with natural hair loving ingredients.


Follow me on Twitter | Add me on Bloglovin' |   
Related Posts with Thumbnails